|
|||||||||||||||
Atmel ARM Cortex-M7 SAMV71/SAME70 RTOS Demo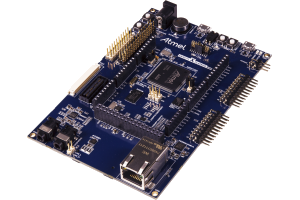
IntroductionThis page documents:
As the SAM V70 includes a superset of functionality, so the SAM V70 Xplained Ultra board can also be used to evaluate running the RTOS on SAM V70, SAM S70, and SAM E70 ARM Cortex-M7 devices.
IMPORTANT! Notes on using the SAMV7 and SAME7 ARM Cortex-M7 RTOS demoPlease read all the following points before using this RTOS port.See also the FAQ My application does not run, what could be wrong?, noting in particular the recommendation to develop with configASSERT() defined in FreeRTOSConfig.h.
Source Code OrganisationThe FreeRTOS zip file download contains the source files for all the FreeRTOS ports, and projects for all the demo applications. It therefore contains many more files than are needed by this project. See the Source Code Organization section for a description of the directory structure and information on creating a new FreeRTOS project.The Atmel Studio project for the SAMV7 demo application is called RTOSDemo.atsln, and is located in the FreeRTOS/Demo/CORTEX_M7_SAMV71_Xplained_AtmelStudio directory. The Atmel Studio project for the SAME7 demo application is called RTOSDemo.atsln, and is located in the FreeRTOS/Demo/CORTEX_M7_SAME70_Xplained_AtmelStudio directory. The IAR Embedded Workbench for ARM workspace for the SAMV7 demo application is called RTOSDemo.eww, and is located in the FreeRTOS/Demo/CORTEX_M7_SAMV71_Xplained_IAR_Keil directory. The ARM Keil project for the SAMV7 demo application is called RTOSDemo.uvprojx, and is located in the FreeRTOS/Demo/CORTEX_M7_SAMV71_Xplained_IAR_Keil directory.
The Atmel ARM Cortex-M7 Demo ApplicationFunctionalitymainCREATE_SIMPLE_BLINKY_DEMO_ONLY is defined in main.c. The behaviour of the demo depends on its setting.
Functionality with mainCREATE_SIMPLE_BLINKY_DEMO_ONLY set to 1If mainCREATE_SIMPLE_BLINKY_DEMO_ONLY is set to 1 then main() calls main_blinky(). main_blinky() creates a very simple demo as follows:
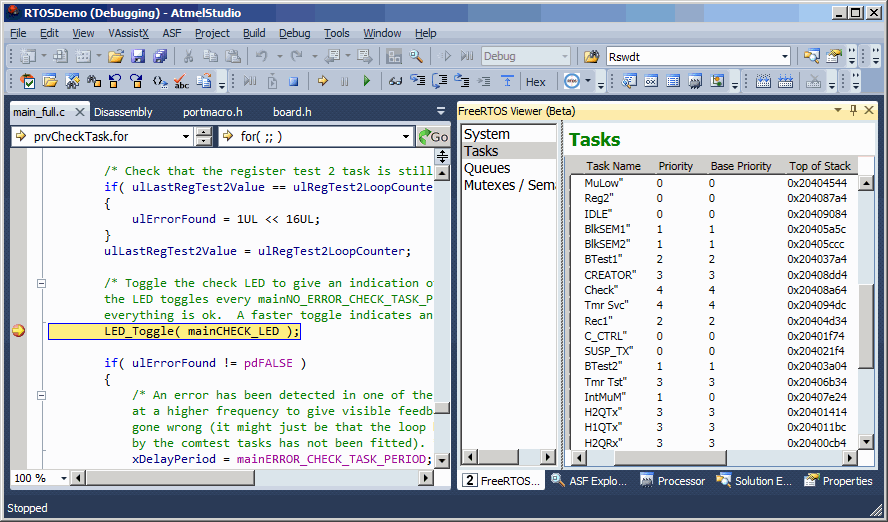
Functionality with mainCREATE_SIMPLE_BLINKY_DEMO_ONLY set to 0If mainCREATE_SIMPLE_BLINKY_DEMO_ONLY is set to 0 then main() calls main_full(). main_full() creates a comprehensive test and demo application that demonstrates: The created tasks are from the set of standard demo tasks. Standard demo tasks are used by all FreeRTOS port demo applications and have no specific functionality. They are used to demonstrate how to use the FreeRTOS API, and to test the RTOS port.A 'check' task is created to periodically inspect the standard demo tasks in order to ensure all the tasks are functioning as expected. The check task also toggles an LED to give a visual feedback of the system status. If the LED is toggling every 3 seconds, then the check task has not discovered any problems. If the LED is toggling every 200 milliseconds, then the check task has discovered a problem in one or more tasks..
Building and executing the demo application - Atmel Studio
Building and executing the demo application - IAR
Building and executing the demo application - Keil
RTOS Configuration and Usage Details
ARM Cortex-M7 FreeRTOS port specific configurationConfiguration items specific to this demo are contained in FreeRTOS/Demo/CORTEX_M7_SAMV71_Xplained_IAR_Keil/FreeRTOSConfig.h or FreeRTOS/Demo/CORTEX_M7_SAME70_Xplained_IAR_Keil/FreeRTOSConfig.h. The constants defined in this file can be edited to suit your application. In particular -
Attention please!: See the page dedicated to setting interrupt priorities on ARM Cortex-M devices. Remember that ARM Cortex-M cores use numerically low priority numbers to represent HIGH priority interrupts. This can seem counter-intuitive and is easy to forget! If you wish to assign an interrupt a low priority do NOT assign it a priority of 0 (or other low numeric value) as this will result in the interrupt actually having the highest priority in the system - and therefore potentially make your system crash if this priority is above configMAX_SYSCALL_INTERRUPT_PRIORITY. Also, do not leave interrupt priorities unassigned, as by default they will have a priority of 0 and therefore the highest priority possible. The lowest priority on a ARM Cortex-M core is in fact 255 - however different ARM Cortex-M microcontroller manufacturers implement a different number of priority bits and supply library functions that expect priorities to be specified in different ways. For example, on Atmel SAMV7/SAME7 ARM Cortex-M7 microcontrollers, the lowest priority you can specify is in fact 7 - this is defined by the constant configLIBRARY_LOWEST_INTERRUPT_PRIORITY in FreeRTOSConfig.h. The highest priority that can be assigned is always zero. It is also recommended to ensure that all priority bits are assigned as being preemption priority bits, and none as sub priority bits, as they are in the provided demo. Each port #defines 'BaseType_t' to equal the most efficient data type for that processor. This port defines BaseType_t to be of type long.
Interrupt service routinesUnlike many FreeRTOS ports, interrupt service routines that cause a context switch have no special requirements, and can be written as per the compiler documentation. The macro portEND_SWITCHING_ISR() can be used to request a context switch from within an interrupt service routine.Note that portEND_SWITCHING_ISR() will leave interrupts enabled. The following source code snippet is provided as an example. The interrupt uses a direct to task notification to synchronise with a task (not shown), and calls portEND_SWITCHING_ISR to ensure the interrupt returns directly to the task.
void Dummy_IRQHandler(void)
{
long lHigherPriorityTaskWoken = pdFALSE;

    /* Clear the interrupt if necessary. */
    Dummy_ClearITPendingBit();

    /* This interrupt does nothing more than demonstrate how to synchronise a
    task with an interrupt.  A task notification is used for this purpose.  Note
    lHigherPriorityTaskWoken is initialised to zero. */
    vTaskNotifyGiveFromISR()( xTaskToNotify, &lHigherPriorityTaskWoken );

    /* If the task with handle xTaskToNotify was blocked waiting for the notification
    then sending the notification will have removed the task from the Blocked
    state.  If the task left the Blocked state, and if the priority of the task
    is higher than the current Running state task (the task that this interrupt
    interrupted), then lHigherPriorityTaskWoken will have been set to pdTRUE
    internally within vTaskNotifyGiveFromISR().  Passing pdTRUE into the
    portEND_SWITCHING_ISR() macro will result in a context switch being pended to
    ensure this interrupt returns directly to the unblocked, higher priority,
    task.  Passing pdFALSE into portEND_SWITCHING_ISR() has no effect. */
    portEND_SWITCHING_ISR( lHigherPriorityTaskWoken );
}
Only FreeRTOS API functions that end in "FromISR" can be called from an interrupt service routine - and then only if the priority of the interrupt is less than or equal to that set by the configMAX_SYSCALL_INTERRUPT_PRIORITY configuration constant (or configLIBRARY_MAX_SYSCALL_INTERRUPT_PRIORITY).
Resources used by FreeRTOSFreeRTOS requires exclusive use of the SysTick and PendSV interrupts. SVC number #0 is also used.Switching between the pre-emptive and co-operative RTOS kernelsSet the definition configUSE_PREEMPTION within FreeRTOSConfig.h to 1 to use pre-emption or 0 to use co-operative. The full demo application may not execute correctly when the co-operative RTOS scheduler is selected.Compiler optionsAs with all the ports, it is essential that the correct compiler options are used. The best way to ensure this is to base your application on the provided demo application files.Memory allocationSource/Portable/MemMang/heap_4.c is included in the ARM Cortex-M7 demo application project to provide the memory allocation required by the RTOS kernel. Please refer to the Memory Management section of the API documentation for full information.MiscellaneousNote that vPortEndScheduler() has not been implemented.
Copyright (C) Amazon Web Services, Inc. or its affiliates. All rights reserved.
|
|||||||||||||||


NXP tweet showing LPC5500 (ARMv8-M Cortex-M33) running FreeRTOS.
Meet Richard Barry and learn about running FreeRTOS on RISC-V at FOSDEM 2019
Version 10.1.1 of the FreeRTOS kernel is available for immediate download. MIT licensed.
View a recording of the "OTA Update Security and Reliability" webinar, presented by TI and AWS.
FreeRTOS and other embedded software careers at AWS.

![]()


![]()