|
|||||||||||||||
Installing Eclipse for use with FreeRTOS.orgNote: This page is very out of date, and describes steps that are no longer required. Please also view the page that describes how to use virtual and linked folders in Eclipse projects.This page describes how to install Eclipse for use with the FreeRTOS Eclipse demo projects - resulting in a completely open source embedded cross development environment. The Eclipse Europa version along with CDT V4 and the official remote debugging launch target are utilised which, when compared to their predecessors, are easier to install and include improved functionality. Julian Friedrich has also been good enough to publish up to date instructions for our German speaking users in the FreeRTOS Interactive forums. Thanks Julian! The FreeRTOS Eclipse projects are provided pre-configured for interfacing with the required external tools, such as flash programmers, compilers and JTAG interfaces. This page only describes the installation and use of the tools that are common to all the FreeRTOS Eclipse demos. The documentation page specific to each individual demo provides the information on installing any extra tools that are relevant to that demo only - it is there essential to read the documentation for the demo you are using in addition to this page. Information is also provided on how the FreeRTOS projects have setup the Eclipse CDT version 4. This supplemental information is not required to use the demo projects, but may be of interest to those creating new Eclipse projects. Installation steps:
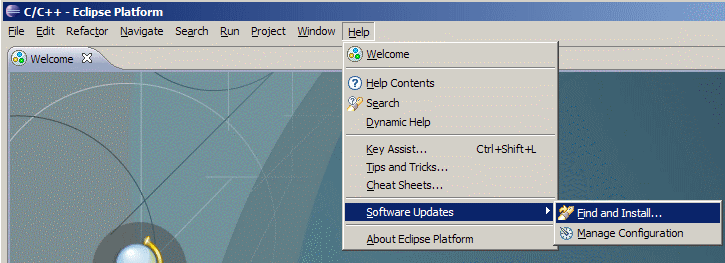
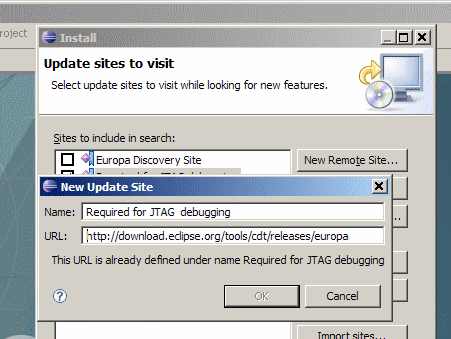
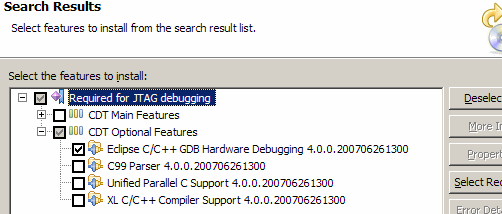
Installing the Eclipse development environmentJava Runtime EnvironmentEclipse is primarily written in Java so requires the Java Runtime Environment (JRE) to execute. Most computers will already have the JRE installed. To check if this is the case for your computer, open a command prompt and type "java -version". If the command is not recognised then you will need to download and install the JRE from Sun Microsystems prior to installing Eclipse.I successfully used Java version 1.6.0_01 Eclipse FrameworkDownload and install the Eclipse Framework. Select for download the "Eclipse IDE for C/C++ Developers" version that is correct for your host environment as this includes both Eclipse and the C/C++ development plugins (the CDT) as a single download. Installation is simply a matter of unzipping the files into a convenient location - there is no installation procedure as such. Note that I have only tested the setup from a Windows host, and the FreeRTOS demo projects are configured to interface to external Windows tools.Adding remote debugging capabilityThe "Eclipse IDE for C/C++ Developers" download provides everything that is required to develop applications that will run on the host computer, but this is not what we want to do. Instead, we want to develop applications that can be executed and debugged on a remote microcontroller target. In order to achieve this we require an additional Eclipse component. To install the additional component:
Opening and using a FreeRTOS demo projectOpening a demo projectEclipse stores information on your Eclipse projects in a central location called a workspace - and it is possible to manage all your projects from a single workspace. However, for distribution convenience each FreeRTOS Eclipse demo uses its own workspace, and each such workspace is included in the directory that contains the relevant demo application code. Having a one to one mapping between Eclipse projects and Workspaces in this manner permits each FreeRTOS demo workspace/project to be distributed with settings that are specific to that demo.The location of the workspace associated with a FreeRTOS demo is detailed on the documentation page associated with the demo. The workspace can be opened by either selecting the workspace location when Eclipse starts up, or by selecting "Switch Workspace" from the Eclipse "File" menu. If upon attempting to open a workspace you are presented with a warning message saying the workspace is already open, or not available, then look for a file called .lock within the .metadata directory. If the file exists, delete it, then attempt to open the workspace again. When you open a demo project workspace you will be presented with a familiar looking development environment that includes two 'perspectives' - a C/C++ perspective and a Debug perspective. You can switch between the perspectives using the buttons in the top right corner of the Eclipse Workbench window - highlighted by the red box in the image below.
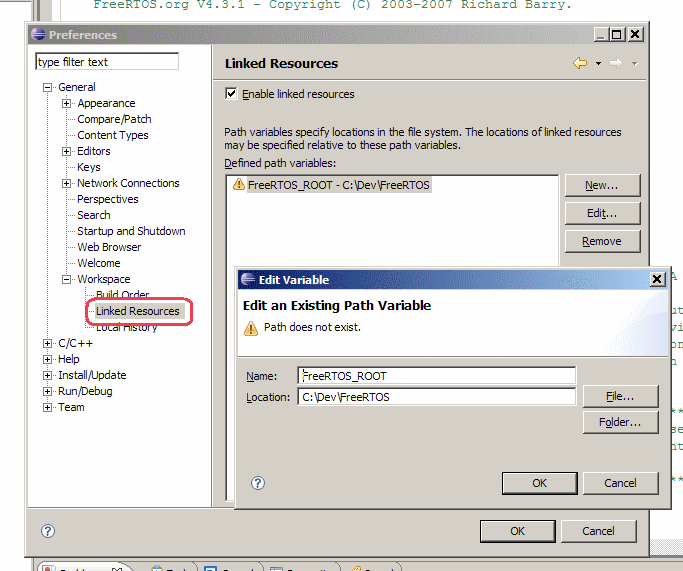
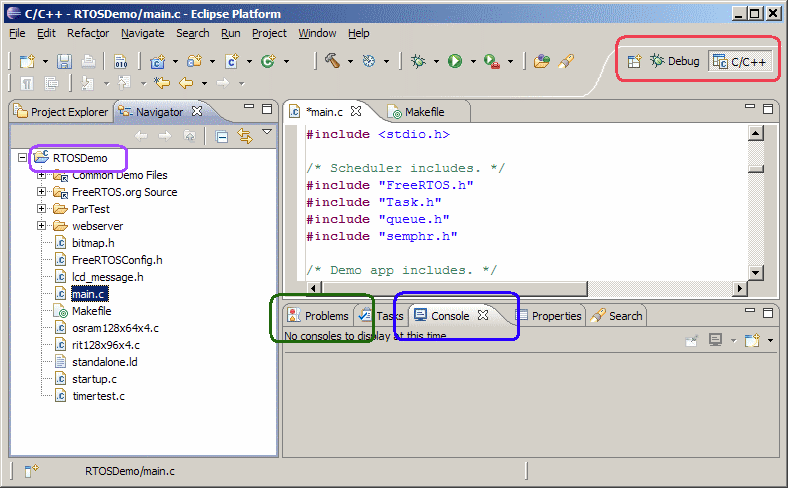 The C/C++ perspective An important project configuration setting!Before using the project it is important to setup the FreeRTOS_ROOT variable as follows:
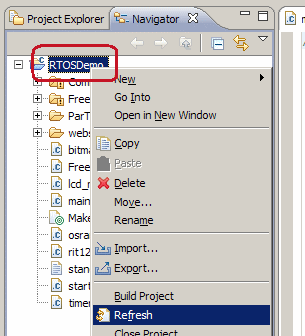
Building a projectSeveral different menu items or keystrokes can be used to build a project. For example, right click on the project name within the navigation pane (highlighted by the purple box in the image captioned "The C/C++ perspective above) then click "Build Project" from the resultant pop up window. I prefer to map function keys to perform common operations - these mappings are then saved as part of the workspace. For example, in the RTOSDemo workspace the F7 key can be used to build the project.The output produced by the compiler will be displayed in the Console tabbed pane - highlighted by the blue box in the image captioned "C/C++ perspective" above - with any errors or warnings also being displayed in the Problems tab - highlighted by the green box in the same image. Clicking on an error or warning in the Problems pane will cause the source line that generated the error/warning to be displayed in the editor pane. Programming the microcontrollerEclipse cannot itself program the flash memory of a target microcontroller but does provide a convenient interface for calling whichever tool is being used for this purpose. The actual tool required depends on the microcontroller being used. Information required to download and install the tool relevant to a particular demo is provided on the documentation page specific to that demo.Each FreeRTOS Eclipse demo project includes a menu item that can be used to program the flash directly from within the Eclipse Workbench. The name of the menu item will depend on the programming tool being used - the image below shows the menu location - in the case depicted OpenOCD was being used as the programming tool.
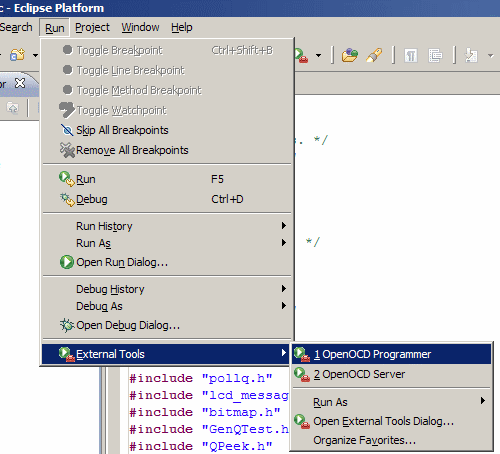 Programming the microcontroller flash from within the Eclipse IDE To program the flash memory of your microcontroller:
NOTE: The flash programming interface may use an internal TCP/IP connections for communication. If you are running a firewall on your host computer then the TCP/IP communication might be blocked. If this is the case you will have to configure your firewall to permit the connections, then restart the flash programming process. Starting a debug server from EclipseEclipse provides a graphical interface to the GDB debugger but does not itself know how to communicate with the target hardware. Usually a separate server application is required for this purpose - the server providing an interface between GDB (running on the host computer) and whichever JTAG interface device is being used. The JTAG interface device actually required is dependent on the demo application being used, with more information being provided on the documentation page specific to the demo.Each FreeRTOS Eclipse demo project includes a menu item that can be used to start the required server application. The name of the menu item will depend on the server being used - the image above shows the menu location - in the case depicted OpenOCD was also being used as the debug interface server. NOTE: Where the same JTAG interface tool is being used to both program the microcontroller flash and to interface with the GDB server then the server application must be stopped before next attempting to program the flash memory. To start the debug server:
Starting an Eclipse debug sessionWith the microcontroller flash programmed, and the debug interface server started (if required), a debugging session can commence. To start a debug session:
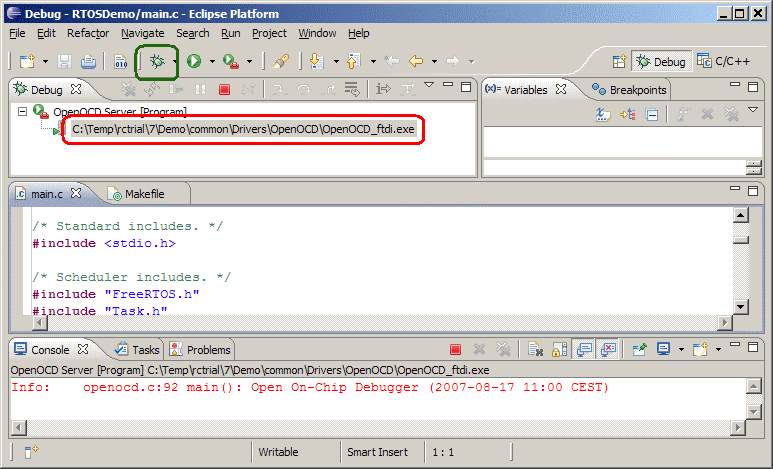 Starting a debug session The debug session should start and the application execute as far as, and breaking on, main(). If the application fails to stop at main() then simply kill the debug session, then click the "Debug RTOSDemo" button again. Controlling an Eclipse debug sessionEclipse provides all the debugging features that would be expected - step into, step over, break points, disassembly views, memory and variable inspection, etc.The debug session execution can be controlled using the buttons highlighted by the red box in the image below. Note that the buttons might not be active unless the GDB session is select within the Debug pane - as highlighted by the green box in the image below. Alternatively the execution commands can be mapped to key stokes. For example, in the RTOSDemo workspace I have mapped F11 to the Step Into command, and F10 to the Step Over command.
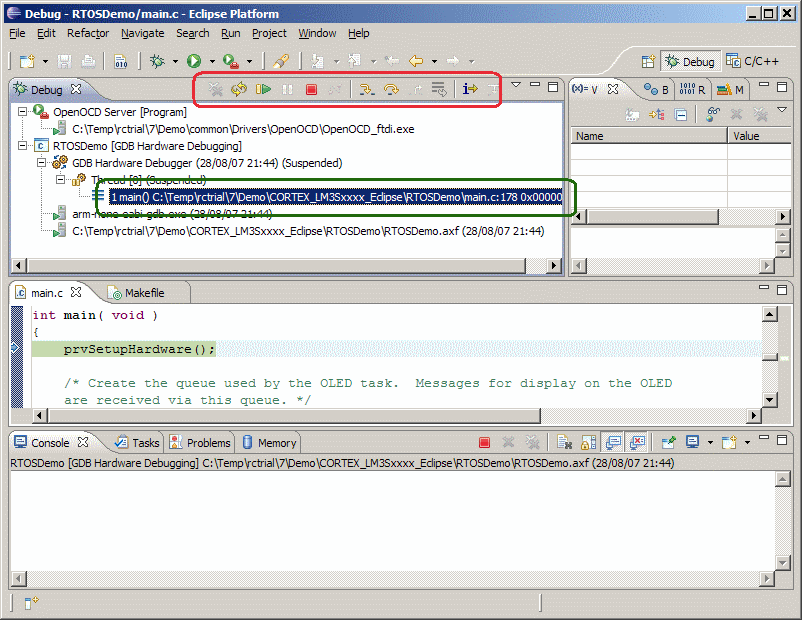 The buttons used to control a debug session
Terminating a debug sessionTo terminate a debug session:
Copyright (C) Amazon Web Services, Inc. or its affiliates. All rights reserved.
|
|||||||||||||||
NXP tweet showing LPC5500 (ARMv8-M Cortex-M33) running FreeRTOS.
Meet Richard Barry and learn about running FreeRTOS on RISC-V at FOSDEM 2019
Version 10.1.1 of the FreeRTOS kernel is available for immediate download. MIT licensed.
View a recording of the "OTA Update Security and Reliability" webinar, presented by TI and AWS.
FreeRTOS and other embedded software careers at AWS.


