Quality RTOS & Embedded Software

 Real time embedded FreeRTOS RSS feed 
Quick Start Supported MCUs PDF Books Trace Tools Ecosystem


The FreeRTOS CDT configuration

NOTE: Due to moderate improvements in the way Eclipse handles project relative paths this documentation page is now obsolete, and has been superseded with a page that describes how to use virtual folders and links.


These subsections provide a little information on how the FreeRTOS demo projects are setup within the Eclipse CDT. The information is not required to use the demo projects, but may be of interest to those creating new projects.

The Navigator window of the Eclipse Workbench CDT will by default show all the files and sub directories that are within the project directory. This has two problems - fist files that are included in your build but are located elsewhere in your files system will not be shown, and second, files within the project tree that are unrelated to your build will be shown. To fix the first problem we need to create links within the Navigator to external directories. To fix the second problem we need to create a working set.

Including source code from outside of the Eclipse project directory tree

In line with the established FreeRTOS directory structure, the FreeRTOS Eclipse projects are contained within directories named FreeRTOS/Demo/[project name]. Each such project needs to include code that is common to all the demo applications and the FreeRTOS.org source code itself - but these items are contained in directories higher up the directory structure - the FreeRTOS/Demo/Common directory and FreeRTOS/Source directory respectively. As these are higher up the directory tree than the project directory they will not automatically be visible in the navigator window.

The FreeRTOS projects have been configured to include links to these directories. This was achieved using the following procedure:

  1. Make sure the project is selected within the Navigator pane.
  2. Select "Properties" from the Eclipse Workbench "Project" menu.
  3. Expand the "C/C++ General" tree, then select "Paths and symbols" - highlighted by the blue box in the image below.
  4. Select the "Source location" tab - highlighted by the red box in the image below, then the "Create / link folder" button - highlighted in yellow in the image below.
  5. A dialogue box will appear that permits you to create a new link. Within this dialogue, click the "Advanced" button, then check the "Link to folder in the file system" box.
  6. You can now enter an appropriate name for the link, and the path to the folder to which the link is being made. Note however that only absolute paths can be entered, which is no good if, as in the case of FreeRTOS.org, the project is going to be used on different computers. To get around this you can create a variable that holds an absolute path. The FreeRTOS projects use the variable FreeRTOS_ROOT for this purpose. Users need then only change the definition of this variable in order to use the project. Instructions for setting the FreeRTOS_ROOT variable were provided earlier on this page.

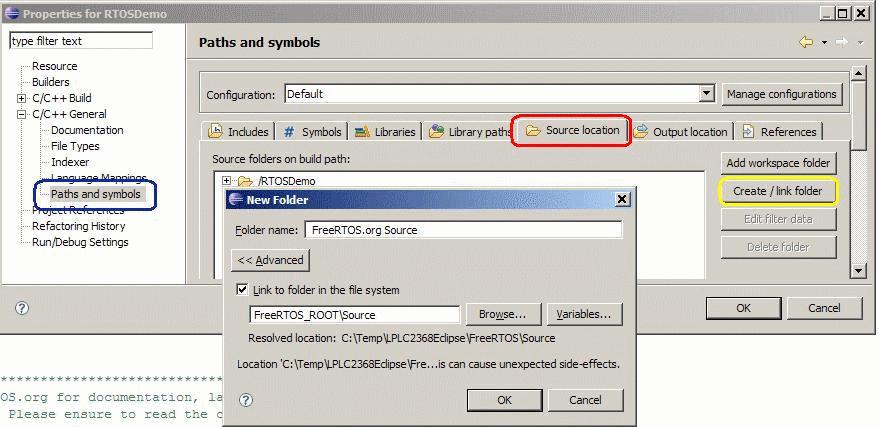
Creating a file system link
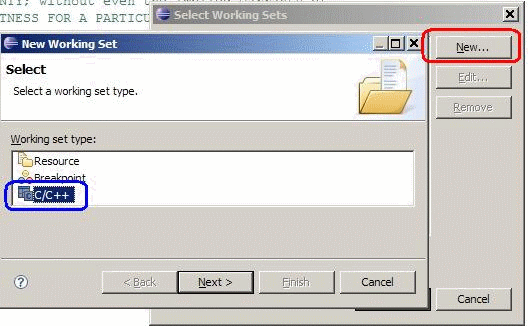
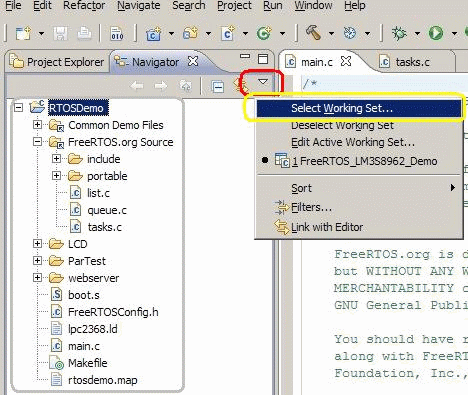

Creating a working set

Now we have created links to the directories that contain the required source files we next need to select which of these files we want to appear within our Navigation pane. Again, the FreeRTOS projects are already configured to only display the required files. This was achieved using the following procedure:
  1. From the "Window" menu within the Eclipse Workbench, select "Working Sets", then "Edit". The "Working sets" dialogue box will appear.
  2. Click the "New" button - highlighted in red in the image below. A new working set wizard will appear.
  3. Under "Working Set Type", select "C/C++" - highlighted in blue in the image below, then click the "Next" button.


    Creating a new working set

  4. A window will appear that allows you to first name the working set, then individually select the files and directories that should be part of that set. Note that you can also select files from the linked directories (those directories that are not within the project directory but to which we have created links).
  5. Once the working set has been created, click the downward pointing arrow within the Navigator pane - highlighted in red in the image below - then select "Select Working Set" from the resultant pop up menu. Your navigator pane will then only show the files you have selected as being part of your project, no matter where they are located within your file system - highlighted by the gray box in the image below.


    Selecting the working set to show


[ Back to the top ]    [ About FreeRTOS ]    [ Privacy ]    [ Sitemap ]    [ ]


Copyright (C) Amazon Web Services, Inc. or its affiliates. All rights reserved.

Latest News

NXP tweet showing LPC5500 (ARMv8-M Cortex-M33) running FreeRTOS.

Meet Richard Barry and learn about running FreeRTOS on RISC-V at FOSDEM 2019

Version 10.1.1 of the FreeRTOS kernel is available for immediate download. MIT licensed.

View a recording of the "OTA Update Security and Reliability" webinar, presented by TI and AWS.


Careers

FreeRTOS and other embedded software careers at AWS.


FreeRTOS Partners

ARM Connected RTOS partner for all ARM microcontroller cores

Espressif ESP32

IAR Partner

Microchip Premier RTOS Partner

RTOS partner of NXP for all NXP ARM microcontrollers

Renesas

STMicro RTOS partner supporting ARM7, ARM Cortex-M3, ARM Cortex-M4 and ARM Cortex-M0

Texas Instruments MCU Developer Network RTOS partner for ARM and MSP430 microcontrollers

OpenRTOS and SafeRTOS

Xilinx Microblaze and Zynq partner